Powerpage User Guide
 Version 8.0.0 August 2016  


www.powerpage.co.nz


Powerpage User & Admin Guide

Internet Service (SaaS)

Only on Microsoft Azure


Contents

Powerpage gives users the ability to send two-way text messages directly to mobile phones and one-way to pagers from their email system or web-browser over an Intranet or the Web.

PO Box 331625, Takapuna, Auckland 0740, New Zealand   Telephone: +6421489580
- cover -
 Powerpage User Guide
 Version 8.0.0 August 2016 < [contents] >

Login ID & Password

System administrator provides users with login ID and Password, which should not be shared with others. Login and click "Manage your Profile" button to change your user profile;


Notes:
  • Login ID is allocated by system administrator and cannot be changed by user
  • Frequently used default group may be selected from the drop-down listbox
  • Email address is used for acceptance of messages and return of replies
  • Select whether status and/or replies should be returned to user by email
  • Click the "Update Profile" button to save changes
  • To change password, enter a new password TWICE and Change Password to save
- 1 -
 Powerpage User Guide
 Version 8.0.0 August 2016 < [contents] >

Sending messages to a Group

Click "Staff Txt", select a group from the drop-down listbox and then click the "Pick" button to retrieve a list of staff in the group. Just click "Pick" to retrieve your default group.

To send to a group without having to select individual staff, click "GroupTxt".

Select individual staff by checkbox, or click the "Select all" button at the bottom of page to send a message to the entire group. No checkbox indicates staff member cannot accept messages.

Type message in "message" area (or select from "Memo") and click "Send message" button.


Notes:
  • Staff may be members of multiple groups and have multiple devices
  • Character counter includes message text and prefix/suffix if used
- 2 -
 Powerpage User Guide
 Version 8.0.0 August 2016 < [contents] >

Sending messages to individuals

Find staff in any group by typing a part name, number, position or location in the search field and click "Find/List" to retrieve a list of matching staff.

Select individual staff by checkbox, or click "Select all" button at the bottom of page to send the message to all retrieved staff. No checkbox indicates staff member cannot accept messages.

Type message in "message" area (or select from "Memo") and click "Send message" button.


Notes:
  • Only one search can be in effect at a time
  • Narrow the search with more input characters (widen with less)
  • Character counter includes message text and prefix/suffix if used
- 3 -
 Powerpage User Guide
 Version 8.0.0 August 2016 < [contents] >

Sending messages to single numbers with QuickTxt

Enter a mobile number in the provided field. Use the international format if known.

Type message in "message" area (or select from "Memo") and click "Send message" button.


Notes:
  • Enables Txting to a mobile that is not present in the TxtDirectory
  • Special handling of Pagers: prefix number with 3 zeros 000
- 4 -
 Powerpage User Guide
 Version 8.0.0 August 2016 < [contents] >

Sending messages to multiple numbers with List-2-txt

Enter mobile numbers into the list manually, one on each line, or copy & paste from another application such as a spreadsheet or text document. All numbers are validated before sending.

Type message in "message" area (or select from "Memo") and click "Send message" button.


Business Continuity Tip: Ask recipients to reply with their name & location.
This provides an easy match of replies/recipients when sending messages from a list of
numbers, especially if some recipients are not present in the TxtDirectory database.

Notes:
  • Enables Txting to multiple numbers up to a maximum of 2,500 per batch
  • Numbers matching recipients if present in the TxtDirectory database
  • Numbers "normalised" to local networks 021, 022, 027, 029 etc.
  • Recipients' numbers do not need to be in the TxtDirectory
  • Special handling of Pagers: prefix number with 3 zeros 000
- 5 -
 Powerpage User Guide
 Version 8.0.0 August 2016 < [contents] >

Message Confirmation & Email Submission

When a message is sent, a confirmation page indicating success or error status is shown;


Sending & Receiving Messages by Email

Powerpage accepts messages for processing providing they are emailed from a valid email address linked to an active Powerpage Login ID. Use the following email addressing scheme for recipients;
  • New Zealand specific network: [021. 022. 026. 027. 029.]numberpowerpage.co.nz
  • NZ short/long format: 021numberpowerpage.co.nz or 6427numberpowerpage.co.nz
  • International GSM long format : +35387numberpowerpage.co.nz (plus optional)
  • Email Alias/Linked Number: Aliaspowerpage.co.nz (substitute your domain on Intranets)
  • Refer administrator for email parts to be sent; Sender/Subject/Text
Notes:
  • For best results, send emails in plain text without footers
  • Do not send attachments, which will be discarded by Powerpage anyway
  • If requested, status and reply status messages will be emailed to your inbox
  • Your sender email address must match the valid email address on your login id
- 6 -
 Powerpage User Guide
 Version 8.0.0 August 2016 < [contents] >

Messages Sent & Received Log

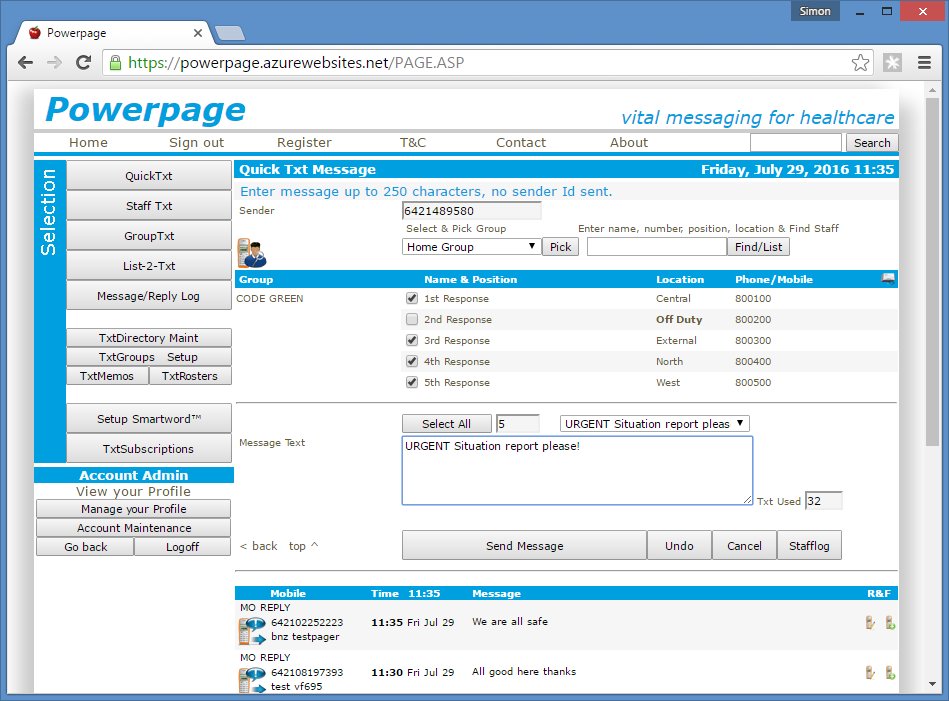
Click "Message/Reply Log" to review message log, most recent messages shown first.


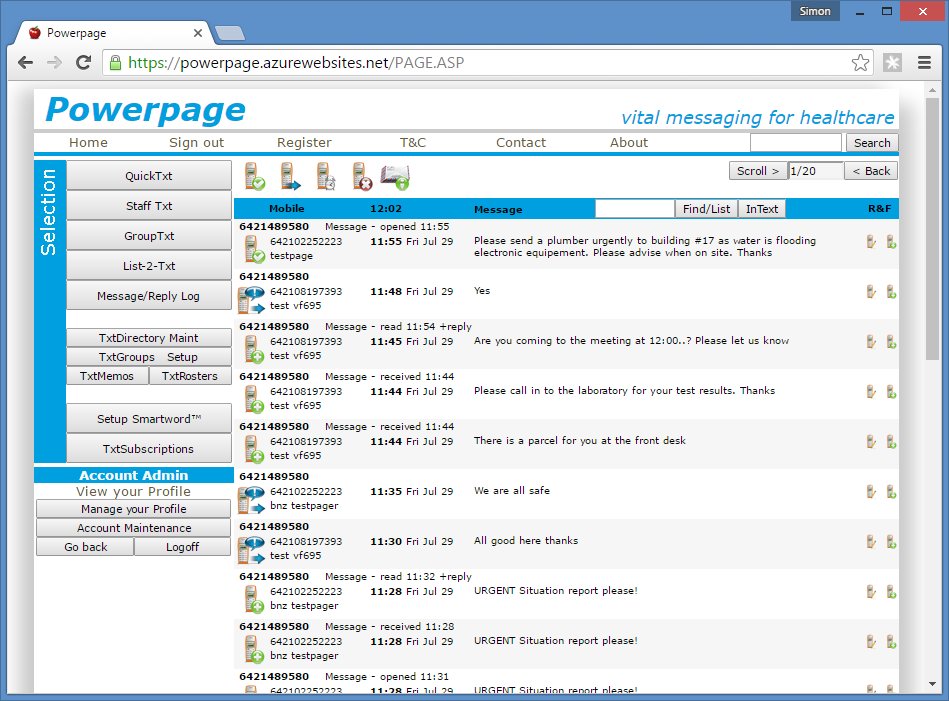
Full text of message is shown with recipient network/number and staff name, if known, in the database. Date/Time indicates when the message was submitted to the mobile network or receipt of a reply, which may include optional notification by email.

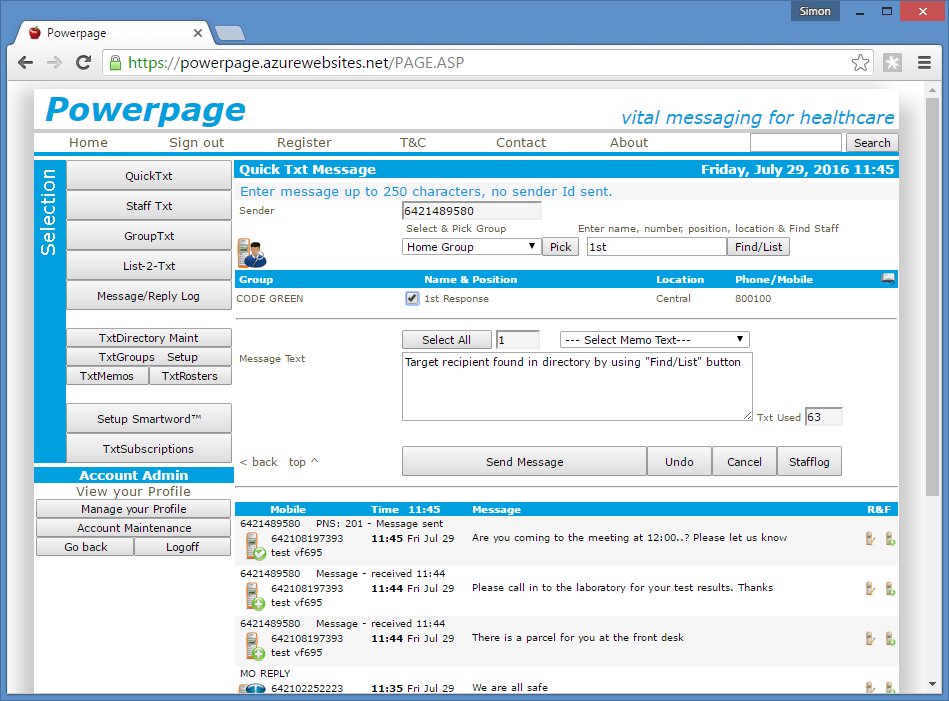
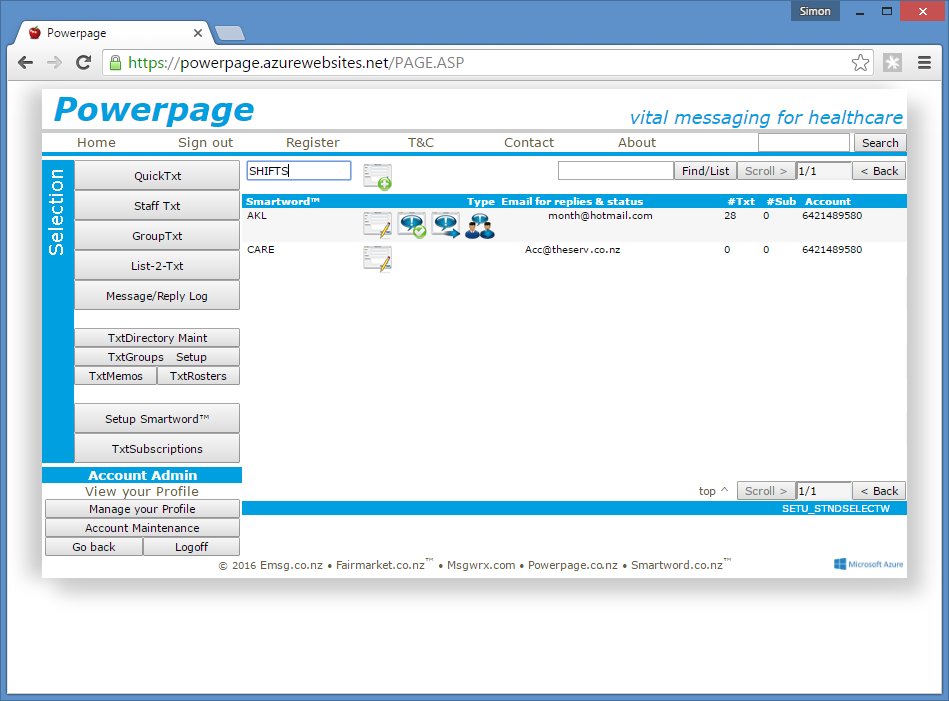
Use quick icons to filter messages or Find messages by entering part name or number in search field and click "Find/List", or search for text in sent messages by clicking "InText"

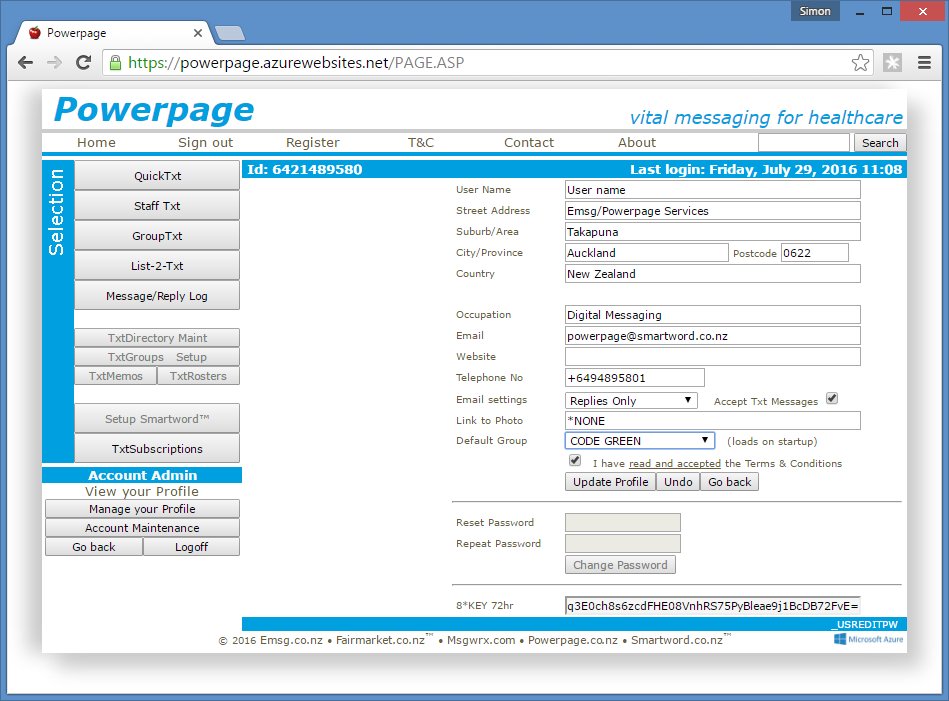
Log access levels are determined by Login ID type;
USR - Able to view messages sent by the ID, not able to maintain database
MST - Able to view messages sent by the ID and maintain database
PWR - Able to view messages sent by any ID, not able to maintain database
SEC - Able to view messages sent by any ID and maintain database
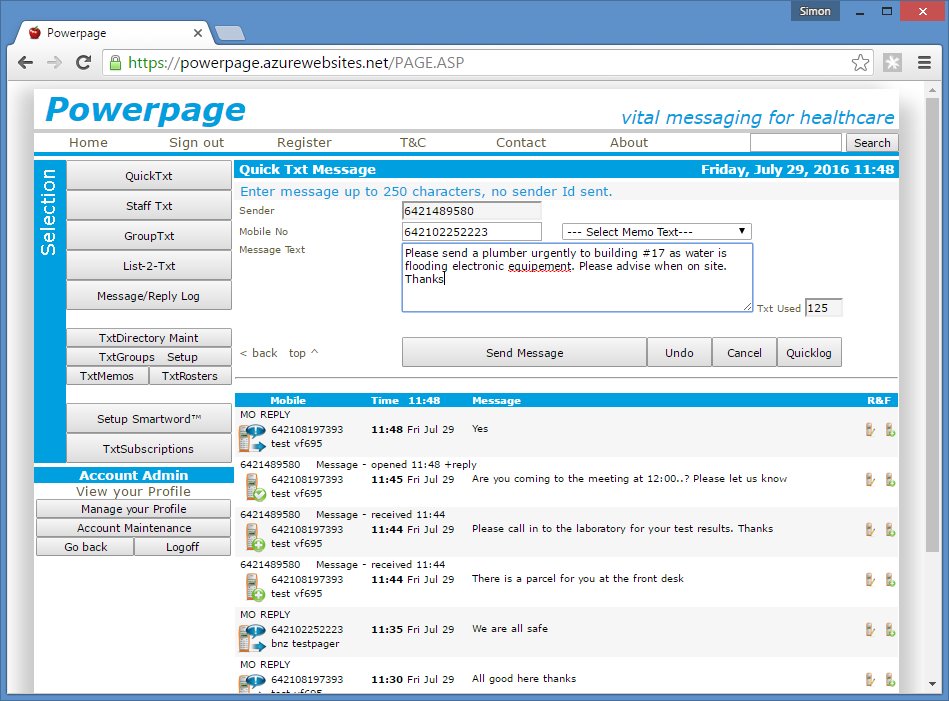
Icon Descriptions
Message sent Ok (click for messages to this number)      Message queued
  Reply received (click to see original message)        Unanswered
Message sent Ok, reply received (click for messages to this number)
Message send Failed     Smartword Updated Ok     *GROUPCALL
- 7 -
 Powerpage Admin Guide
 Version 8.0.0 August 2016 < [contents] >

TxtDirectory Administration & Maintenance

System administrator only can modify user levels so Master (MST) or Security (SEC) access is granted to maintenance functions. Click "maintenance" button to open maintenance pages.


Select a group from the drop-down listbox at top left, or find staff in any group by typing a part name in the search field beside the Name search icon, then click the icon to retrieve staff list.

To maintain staff entries:

to create a completely new staff entry
to create new entry using existing details
beside desired entry to maintain details or delete

Mandatory Fields: Name, Group, Network and Direct Number.

Optional Fields: Job Title/Position, Location, Telephone, Mobile Phone, Email and URL address are informational only. Leave Roster as Default unless rosters have been setup. See next page.
- 8 -
 Powerpage Admin Guide
 Version 8.0.0 August 2016 < [contents] >

Staff Maintenance Page

Edit mandatory data for this staff entry; Name, Group, Network and Device number

Click "Update" button to save changes, or click "Delete" button to remove entry

Notes:
  • Name to appear in the log and on email replies
  • Select Group from the drop-down listbox (enter new groups in TxtGroups)
  • Select the Network from the drop-down listbox for device
  • Enter Direct Number for device without 021/022/026/027/029 for local networks
  • Enter full international number with country prefix for GSM networks
  • If required, enter device Alias for use with email (instead of actual number)
  • Set "accept all" flag on/off to accept/reject messages from unknown senders
- 9 -
 Powerpage Admin Guide
 Version 8.0.0 August 2016 < [contents] >

Standard Message Maintenance Page

To maintain Memo messages, click "TxtMemos" button then new, edit or copy as required.


Notes:
  • Enter up to 120 characters of text for the message
  • The message will appear on the send message pages in drop-down listbox
  • Change or add information to the message when sending to recipients
  • Click "Update" Button to save changes, or "Delete" to remove entry
- 10 -
 Powerpage Admin Guide
 Version 8.0.0 August 2016 < [contents] >

Creating a Smartword™ Page

To maintain a Smartword™, click "Setup Smartword™" button then edit or copy as required.

To create a new Smartword™, enter the desired word (it must be unique) in the provided field, click the Add button and continue to edit as required. Word is rejected if already used.


Notes:

view messages sent using this Smartword™
send a new message with this Smartword™ prefix
send a message to all users of this Smartword™

- 11 -
 Powerpage Admin Guide
 Version 8.0.0 August 2016 < [contents] >

Maintaining a Smartword™ Page

Enter the text the users will get when they Txt this Smartword™ to 407 It can be up to 160 characters, less the length of the Smartword™ itself.

Select a Class/Menu type for this Smartword™
  • *BLIND Prevents public listing and access
  • *ONEKEY For one-time access code generation and vouchers
  • Any other type for public listing and usage of the Smartword™

Notes:
  • Do NOT charge for the Smartword™ unless intended users have a Msgwrx account
  • The message will appear on the mobile exactly as it is entered here
  • Enter Minor category and Short desc to appear on public listing
  • Click "Update" Button to save changes, or "Delete" to remove entry
- 12 -
 Powerpage Admin Guide
 Version 8.0.0 August 2016 < [contents] >

Group Maintenance Page

To maintain Groups click "TxtGroups Setup" button then edit or copy as required.

For a new group enter an Alias first, then click the Add icon.


Notes:
  • The Alias must only contain valid Email/SMTP characters
  • Staff Group is mandatory and appears in all group dropdown lists
  • Enter a new Staff Group or select from the drop-down listbox for all pre-defined groups
  • A *GROUPCALL accesses the roster to determine whether or not to send to any device
  • Only valid Master (MST) users can send a *GROUPCALL by email, preventing misuse
  • Click "Update" Button to save changes, or "Delete" to remove entry
  • An emailed *GROUPCALL has the address Aliaspowerpage.co.nz
TIP: Setup all your TxtGroups in advance, then they can be selected from the drop-down listbox in staff maintenance.
- 13 -
 Powerpage Admin Guide
 Version 8.0.0 August 2016 < [contents] >

Roster Maintenance Page

To maintain rosters, click "TxtRosters" button then edit or copy as required.

For a new roster enter a roster name first, then click the Add icon.


Notes:
  • Roster Name (no spaces) appears in drop-down listbox on staff maintenance page
  • Enter a description for the Roster
  • Check each box representing the hours "on duty" for this roster
  • On the message sending page, staff will show as "OFF DUTY"
  • Messages sent direct from message send page override roster setting (i.e sent anyway)
  • Only a GroupTxt online or via email will access the roster when processing messages
  • Click "Update" Button to save changes, or "Delete" to remove entry
- end -